Grow Veggies in the Winter with Row Covers
Each season has its purpose in farming cycles. We plant in the spring, crops thrive and grow in the summer, and in the fall we harvest and celebrate. Winter is traditionally a time for rest and renewal. However, if it’s necessary for your family or homestead, you can have successful gardening in Winter with row covers to protect your veggies. The following steps will help make your winter veggies grow better. Especially if you are in a colder area of the country, like us in Tennessee at Stoney Creek Farm.
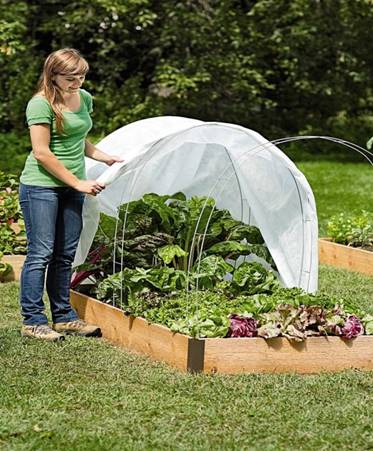
Benefits of Plastic Row Covers
Putting plastic row covers over your crops helps keep them warm and protected from frost during the winter. Even if your climate isn’t especially cold, but maybe rainier in the winter, these covers will keep excess moisture from drowning your plants. This extension to your crops’ growing time means that you could have an almost year-round harvest. Plastic row covers can extend growing time by a full month or two, depending on the crop and particular climate.
The science behind plastic row covers works similarly to that of a cold frame. Since plastic is a type of insulation, the sun can heat the inside anywhere from 5° to 10° more than the air outside. At night, the plants are safe and cozy from the retained daytime heat The plants will rest at 2°-7° more than they would be without the row cover in place.
Depending on your farm and your needs, you can make plastic row covers that are semi-permanent and big enough for you to walk inside, or you can make small, portable ones that take fewer supplies but still grow shorter plants (such as root veggies and leafy greens) quite well.
How to Prepare for Winter Gardening with Row Covers
Growing crops in the winter take proper planning—before the cold months arrive.
Find a sunny location. – Your garden beds will need to be in a place that gets as much sun as possible since the winter sun is not only less prominent but weaker. During the winter, the sun’s angle is lower in the sky, which makes more shadowy areas, so you’ll need to pick a place that is less obstructed by buildings and trees.
Choose winter-hardy veggies. – Certain vegetables grow better in the winter than others, and some can even stand up against light frost. Root veggies almost always do well (e.g., carrots, potatoes, turnips, parsnips), and so do many greens (e.g., spinach, kale, and some varieties of lettuce). Some plants will even become sweeter if they’re exposed to colder temperatures.
Plant seeds at the right time. – When you’re hoping for a winter harvest, plant in August and September. If you wait too long and plant later in the fall, your crops won’t be big enough for harvesting until spring because they won’t receive enough daylight.
Transfer seedlings properly. – Look carefully at the directions on your chosen seed packets. When you transfer seedlings into the ground, make sure that you’re planting them at the same depth they were placed in their original sprouting container.
Making Your Own Row Covers
Row covers aren’t difficult, but you’ll need some specific materials and the knowledge of how to place them properly over your crops so that they do their job well.
- Cut and place the wire. – Your plastic row covers will sit atop strong wire. If you want an average-sized row cover, cut coiled wire (with a wire cutter) into 5-foot lengths. (The best wire for row covers is #8- or #9-gauge wire; you can also use 5/8” plastic tubing.) Then, carefully insert each end on either side of your beds, securing it at least six inches into the ground. Each wire length should be about 4 or 5 feet apart (enough space for plants to keep growing but close enough together to support the weight of the plastic). You should end up with arch shapes that run the length of your plant beds. (If you need larger covers for taller plants, adjust your wire lengths.)
- Stretch and anchor the plastic. – Purchase high-quality, 2-6-mil polyethylene sheeting that is made specifically for crop covering. Most home improvement stores will carry this on hand. If yours has a variety of mil sizes, know that 1 mil is equivalent to 1/1000 of an inch, so the thicker the mil, the thicker the plastic. If you can find a cover that also offers UV protection, this will give your plants some extra protection, too! (Don’t skimp and just use basic plastic—it won’t hold up and your efforts will be wasted!)
Stretch it over your wire hoops and secure it using heavy anchors, such as sandbags, cinder blocks, or something else that can withstand winter weather. This will keep your covers in place for the long term. If you want your hoops to be more permanent, you could also secure them to a foundation. You could even secure covers to your raised beds if you already have some! Make sure the edges are left open for proper ventilation.
For Even More Success
- Check on your crops weekly. – Once a week or so, lift the plastic and check how wet or dry your plants are, giving them the proper amount of water. Don’t forget to replace the anchors when you put the plastic back down!
- Let them sunbathe on warm days! – Every growing thing deserves to bask in the sun. On bright days when it’s above 50°F, take the plastic off and give your plants some extra sun. This also keeps them from getting overheated underneath the plastic.
Conclusion
Growing winter veggies is a great way to keep your family nourished and keep your homestead profitable in the winter. Just as with any aspect of farming, gardening, or growing, this new skill might take some practice. For some extra knowledge straight from Stoney Creek Farm, check out our previous blog post on supporting seeds during germination so that they’re well-prepped for winter growing. Let us know what you’re planning to grow next winter, or if you’ve had success with plastic covers in the past!